
 Preparation is confidence (right when you need it the most).
If you take the time to understand and practice the concepts that follow, you may never miss another standing big game animal to 250 yards or more. The application of a few simple principles will give you the confidence you need to make the clean kill you paid for when it counts.
Knowing you’ll connect before pulling the trigger requires E.S.P. I am not referring to the paranormal acronym, but equipment, sighting, and planning. These are the ingredients for confidence in the field. It is not necessary to spend a lot of money or spend countless hours practicing. Successful hunters put things together correctly, use what they have wisely, and plan well ahead of the shot.
Setting the table.
For a number of reasons we all experience some degree of buck fever, usually the moment the animal we are seeking appears. That is one of the most exciting moments in life.
Unfortunately, that excitement is also behind some very strange behavior. After all, there is a lot riding on this shot. The details quickly brushed over in days long gone now begin to create doubt: Was the scope sighted dead-on at 100, two or three inches high? Is that buck 150 or 250 yards off? Do I need a better rest? It may be further than it looks, should I hold a little high just in case? Confidence disintegrates just when you need it the most.
To assure success, long before the moment of truth arrives, as many variables as possible must be eliminated. You should have a plan to put into action so your actions will be mechanic, not panic.
Equipment – Friend or Foe?
Let’s spend some time now (rather than a week before the season opener) putting our equipment in order. Put yourself into the hunt for a moment … if you don’t know the answers ask someone who does. How far will you likely be shooting? If the distances tend to be long, you are well advised to invest in a laser rangefinder that quickly returns readings to 800 yards or more. The more expensive models not only range further but also faster, making them worth the extra expense.
How are you planning to hold your gun steady? Do your hunting areas offer natural rests like rocks, trees and logs? A bipod or shooting sticks are nice to have along should nature fail to provide. In any event, a short bipod or firm sandbags will be necessary for the sighting phase to come.
For precisely sighting in, get plenty of one-inch black sticky dots or print your own targets  on your PC. You can even go a bit smaller if your scope will allow you to see them. Forget those big, black bullseye targets, they are for pistoleros and competitive shooters. A smaller bullseye will help you shoot better groups.
A good set of rings and bases to securely mount the scope on the gun, at the proper height, is a must. Checking to be certain it’s unloaded, shoulder the arm and dry-fire a few times.
Now set the gun down, pick it back up and with the eyes closed, shoulder the gun and dry-fire at a small dot on your wall, several times, as quickly as possible. Next, work the bolt from the shoulder, take aim and dry-fire, work the bolt quickly and dry-fire a few more times. It is not necessary to watch the gun do its work. Do not remove the gun from your shoulder nor your eye from the dot when you work the action! Do the same in the field.
Correct anything now that will require turning a screw later.
Are you craning your neck or lifting your cheek off the stock to get a sight picture? You may want to consider a new stock now, not a week before the opener. If your trigger needs adjustment, take it in to get it done now as we’re heading to the range soon. Moving or tightening anything once dialed in with live ammo is strictly forbidden.
Your scope should clear the barrel, mounts, bolt handle, safety and other action parts by a minimum acceptable amount; 0.250” is usually acceptable. Mounts should be made with at least two screws on either side of each ring (that’s usually four screws per ring) especially on magnums.
While you’re in the mood check the action screws to avoid looseness or over-tightening. Receiver screws should be tightened to about 25-30 inch-pounds in a tupperware or non-bedded wooden stock; 45-50 in a well-bedded laminate or laid-up synthetic. This is snug but not cranked. The tightening order on a bolt action is:
- Barely snug the front receiver screw;
- Tighten the rear (tang) screw;
- Tighten the front screw.
In this way, if your receiver bedding is off, at least it will stress the receiver closer to the rear, not under the locking lugs.
As mentioned, scope mounts are critical and the most common cause of mechanical failure. The thought of a single screw potentially blowing the meat shot makes my eyes water; especially if it’s costing me $100 per pound with airfare. I like Talley’s, Warne’s, Weaver’s Grand Slam, and Leupold’s QRW equally, but all my hunters now wear Talley’s. By standardizing, I can carry a spare, pre-zeroed scope along on a backcountry hunt a long way from home. Sighting should be checked after the switch but this is not always possible in game country. I find my Tally’s are rarely far off the mark when removed and replaced on the same rifle and is definitely preferable to canceling the hunt on account of ring failure. Another benefit is that Talley’s QR mounts will allow me to interchange scopes on all my Remington 700 and Weatherby Mark V Magnums without moving the ring position on the scope.
One note regarding equipment and money management; I might buy an inexpensive rifle, but I’ll never buy a cheap scope or mounts. You can’t hit what you can’t see at regardless of what the advertisement says. Reliability and precision are worth paying for in optics. Spend cash on quality, not size. You’ll find that even the smallest objective from a top-of-the-line manufacturer is brighter, clearer and faster to sight than a 50mm bell on a cheap scope. This is due to smaller production tolerances, better glass and the latest multi-coated lens surfaces. I like 40mm objectives, as I can still use most low mounts with them.
If you are investing in new optics, map it out first. You can do this at your gun shop with your rifle in hand or using the Leupold.com Scope Selector. The goal is to achieve the lowest, most solid mounting available for the chosen weaponry.
 Improve your groups tonight or double your money back!
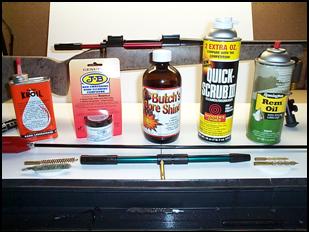 Copper bore fouling is a primary cause of inaccuracy. Get busy with a rod, bronze brush, jags and cotton patches. Use Kroil oil, JB Bore paste (a soft polishing paste), a copper solvent (like Barnes and Butch’s) a Degreaser like Quick-Scrub II and a good gun preserving oil, in that order. Nylon coated one-piece cleaning rods of the proper size and a bore guide will save time, wear and tear on everything.
Instructions are on the labels. The use of bore paste between the Kroil and solvent baths saves time and solvent. Suffice it to say that the final 15 minute copper solvent bath should allow a dry, white patch to be pushed through the bore without any blue (copper) staining. No blue will do! You may then oil lightly and declare completion. (Any blue left on the “last” patch is considered cheating and voids my warranty.)
Long Range Theory : Sighting to hit and forget.
Now that we know that our equipment is mechanically sound let’s size it up ballistically. We will tackle the spreadsheets first, then head to the range. Since our discussion here concerns actually hitting the target, what you hit it with is up to you.
I took two elk last year, one with a .308 Winchester and one with a .300 WSM. The fast-handling .308 was correctly on hand for a snap shot at a running bull. The Short Mag was used from a more deliberate sitting position, using a log for added support.
Check out the river photo below. The edge of the timber has been guessed by some to be three hundred yards or more, but I went into the stand prepared. My Leica Laser 1200 told me the truth hours before a bull swam the river, the kill made well within point blank range.
Not all shots will fit between two goal posts. I just built a .338 Ultra with a 28-inch barrel, but much prefer hauling less weight across the Rockies. The decision rests solely on the situations likely to be encountered where shots will be taken. That ten-pound Ultra is made for deliberate shooting, as in stand hunting trophy animals over canyons and corn, but smaller, lighter rifles are noticeably faster to the shoulder for me. This may make more of a difference than anything. In other words, pick the right gun for the job.
Some interesting observations may be made at the intersection of a line approximately four inches below the line of sight and the bullet’s arched path when sighted in correctly. The bullet not only strikes lower than desired, but it also happens to run out of steam. The term ‘maximum point blank range’(MPBR) is technically defined as ‘the furthest distance we can hold on-center as still achieve a hit within a specified radius,’ but it also makes sense as a practical limit in a number of other ways.
The variables midrange (plus) and downrange (minus) deviation(s) are up to the user to define intelligently. These should be based on the game, distances and conditions likely to be encountered. (see illustration)
The term got a bad rap due to misuse. The five-inch midrange trajectory as defined in the Sierra Bullets Reloading Manual was reputed to have caused some “hits around the edges” and encouraged shots beyond the average shooter’s ability. This got the whole concept in trouble. As a practical mid-range setting, even for big deer, plus four inches is about it unless there are special circumstances.
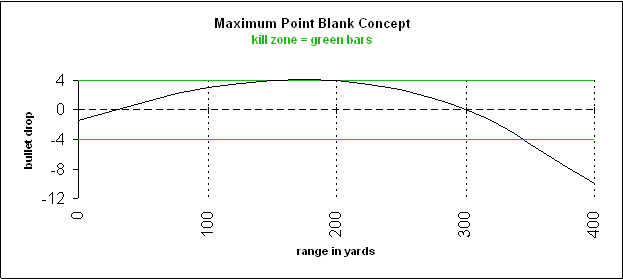 When done correctly, the major advantage a MPBR sighting gives the shooter is confidence. There is never any reason to hold high or low to hit the vitals of a decent buck or bull. From then on you will always hold on the center of the target, just like you always believe your compass. Resist all urges to the contrary. That sucker has to be way, way out there to justify holding high at all. Past MPBR you’d generally be better off not risking a shot at all.
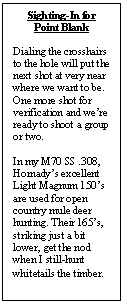
Some argue that mid-range trajectory, when sighted the O’Connor way (three inches high at one hundred yards), will cause misses as well. When so sighted I have broken a spine or two but have never shot over even a small buck at 200 yards! In fact, on larger game with standard rounds it can stand to go a just bit higher, say three-point-five at one hundred, especially if it is likely the animals will appear two hundred yards or more away. Conversely, with extremely flat-shooting rounds like 150 grainers in a .300 RUM, 3.5" is way too high! MPBR is reached with a setting under 3" at 100 so please do be sure to use the ballistics tables before making any decisions.
You may have noticed earlier that something nice also happens at 25 yards – dead on again! Very handy to know when you get a quick shot in the timber or simply want to pot a chicken.
A Day at the Range
Now for some shooting! Set up a target or two at one hundred yards. Place one at twenty-five yards as well.
With your gun solidly in the bags or on the bipod, make friends with your scope for a few minutes. Play with the focus, power ring and adjustable objective if present. Get used to how they all work and which way they turn to do what. Discover the fact that ocular and objective adjustments work in concert to provide the correct sight picture.
Put the crosshairs on a target and, using the ocular (eyepiece) adjustment, focus so everything appears crisp. After looking away for a minute or so do it again and again, refining things even more. Be sure to wear any corrective lenses you will use while hunting. Purposely screw them all up again, have a Coke, then dial them back in again. Your eyes tend to change shape to assist focusing, so all final adjustments should be made after resting them a while.
Adjust the scope for parallax at a hundred yards by first aligning the crosshairs on a bull. While looking through the scope, move your head from side to side, up and down, without touching the gun. Do the crosshairs appear to move relative to the bull? That’s called parallax, and is what the dial around the front bell of your scope (objective) is designed to eliminate. Tweak the objective adjustment (if available) to eliminate it at 100 yards, forget what the graduation markings say, your eyes tell the truth.
Some parallax is unavoidable in the field, especially if you go by the numbers stamped on the scope, but you want everything at the bench to be precise and therefore as meaningful as possible.

Bore sighting for range-flies, paupers & die-hards.
Before we can snap a cap with any hope of hitting the paper we must get the bore and the crosshairs pointing at the same spot. Sure you can spend money on one of those fancy laser devices but I for one would rather see you put it in a new stock. To that goal I’ll tell you that you absolutely do not need one, there’s lots of free methods that work just as well. Here’s the easiest:
- Place the rifle in a solid rest.
- Remove the bolt and scope turret (adjustment) caps.
- Peer down the bore and adjust the bags / bipod until your target is centered in the bore without touching the gun.
- Move your crosshairs to the target (check to be sure it’s still centered in the bore as well.)
- Don’t worry if it moved, just re-center and continue.
- That’s why it’s called “Bore Sighted” – the bore of your rifle is now pointing to the same spot as your sights.
Now for the Famous Two Shot Sight-in (well, maybe three.)
Trial and error sighting is frustrating and will rarely work as planned. Don’t bother with the six clicks this way and four clicks that. Keep your eye on that guy at the range surrounded with empties and holes all over the paper. Hundred bucks he’ll never get it on no matter how many shots he shoots.
The 25 yard goal is simply to hit somewhere visible on the paper at one hundred. If you know your load is reasonably accurate, a single shot at twenty-five will accomplish this.
Now get behind the empty gun like you were putting one downrange. Before we begin shooting, dry-fire (pull the trigger on an empty chamber) several times, as if there is a round in the gun and you were shooting the best group of your life. Concentrate on your sight picture at the moment of truth. The instant you hear the click of a falling pin, where were you pointed? Do it a few more times until you get it right.
- Shoot one solid shot with the chosen round at twenty-five yards. Does not matter how far you are off as long as you can see the hole on the target paper or backing board.
- Take off the turret caps, but do not make any adjustments just yet.
- Put your gun back in the rest, supported solidly front and rear.
- Regardless of where your bullet holes are, center the reticle (crosshairs) on the dot you just aimed at once again.
- Don’t touch / move the gun once it is lined up but keep looking through the scope. (See why you need a solid rest? Bipods are ideal for this.)
- Without moving the gun, gently turn the horizontal (side) adjustment until the vertical reticle bisects the center of the group.
- Do the same for the horizontal reticle using the vertical (top) adjustment.
- Screwed up? Shoot one more shot and repeat if necessary.
If you are zeroed at twenty-five yards, you will be on the paper at one hundred yards with a modern centerfire. Repeat the process there. Now we can get serious …
Since we are hitting the paper let’s refine the sighting for the type of hunting we expect to do with this rifle. If 100 yard shot is a long one for you, you’re done. If you expect you may need to connect at longer ranges, let’s discuss how to prep for it.
As mentioned, three inches high at one hundred yards will be generally be O.K., but a bit of load-specific research will point out any nuances you may wish to apply. Lacking a specific ballistic program, you can use Norma’s Online Ballistics Program located at http://www.norma.cc/us/Ammunition-Academy/Ballistics/, and mess with the sliders to optimize the variables for your specific load, region and game pursued. You’ll have a ball with this one!
From this point on it’s a very simple concept: Hold dead center and kill all the way out to your point blank range. (Table 1) Keep your shots within your MPBR, and you will be very pleased with the result. Yes, I had to shoot over a buck to figure it out, I misjudged the range and held high. The bullet went where I aimed it. Never hold high!
While you are still at the range, do a couple more housekeeping tasks if you have the ammo. Let the barrel cool while you remove the fouling as before. The first shot from a cold, clean bore is the one that really counts, so bear that in mind. I have a great .264 hunting rifle that will not consistently shoot 1” five-shot groups. Yet every time I take it out to check zero it prints the first one from a three-month-cold bore exactly 3” high, dead-on horizontal. That’s a perfect mulie gun!
It’s never too late to break it in.
It does not matter how old your gun is, unlike the motor in your new street-rod, if you have not done it before it’s not too late (unless your bore is shot, of course!) Might even get a few ‘bragging groups’ in the process if you let the barrel cool between shots!
- Clean the bore to the bone being sure to remove all copper from the sight-in.
- Remove any remaining solvent or oil. Degreasing is preferred.
- Shoot 1 shot. Repeat Steps 1 & 2.
- Shoot 2 shots. Repeat Steps 1 & 2.
- Shoot 3 shots. Repeat Steps 1 & 2.
- Shoot 4 shots. Repeat Steps 1 & 2.
- Shoot 5 shots. Repeat Steps 1 & 2.
- Was there any copper (blue on the patches?)
Feel free to fire a few more to verify everything is in order. Don’t try to conserve ammo at this point. If you only had one box of shells left, you’d be better off to fire nineteen for zero and hunt with the one remaining round than fire a couple hoping for the best with what’s left.
Also, be sure to run every cartridge you will likely carry afield through the action and check for smooth feeding. Recently I have found certain idiosyncrasies that could have caused trouble, like a tiny hollow point hanging up on the edge of a feed ramp. Run them through and be sure, even factory loads.
Practice makes perfect.
It is a myth that occasionally dry firing a centerfire rifle will damage it. Practice mounting, firing and working the action, from the shoulder and other field positions, especially sitting. Practice using a sling. Get used to your rifle, especially the trigger. Read up and do it all correctly. It costs nothing and will bring more satisfaction than watching ESPN while eating Haagen Das.
Carry your rangefinder around town for a while and practice calling the distance while waiting for an outside table. Take it on walks, to the beach and while boating or camping, testing others’ skills as well as your own. You will be amazed what yardage is versus what it appears to be.
There is plenty of time to find ranges while stand hunting, still-hunting, spotting or planning a stalk. Rangefinders are better used to determine shooting parameters in advance, rather than waiting until game appears and laser-ranging when you should be shooting. Know how far various landmarks are well before the moment of truth and shoot quickly.

 Planning your shot - Constantly.
This is where the 800 to 1200-yard rangefinders come in handy. They are not for taking shots a half-mile away. For example, if you want to sneak over to the top of a hill 450 yards distant, and you know that big rock is 700, then you know a shot from the hilltop to the rock would be 250 yards, well within your point blank sighting. Now you can put the laser in your pocket and sneak with a certain determination.
Rangefinders are also put to good use to get a feel for how distances appear in the country you are hunting. Use your rangefinder and other resources to determine landmarks such as large rocks, trees, etc. that lie within your PBR before you settle down for a long wait. Work everything into your shooting plan.
Always shoot from the most solid position possible and be sure to select your stands and stalks accordingly. In this way, the moment game appears, you can be confident of your ability to drop it instantly with a dead-on hold. No panic will be required because you already know what needs to be done and when to do it.
Once you have determined to shoot, do your observation through the scope. If you must look away for some reason move your head, not the gun. Don’t hesitate; shoot the instant a good shot presents itself. The only thing you should be seeing at the moment of truth is that pin-point precisely where you want to hit. Aim small and miss small. Keep your head still and your eye intensely focused on the point ... squeeze it off!
Follow Through
It’s not just for golfers anymore. You’ll know soon enough where you hit him, so keep looking through the scope not around it. Due to your home practice sessions, reloading will be so natural you won’t even realize you did it. Give him another one for insurance if necessary.
And don’t forget to buy a cookbook.
- Stocky
Table 1.
Maximum Point Plank Range Field Settings with an 8 Inch Vital Zone (plus or minus four inches)
|
Load |
100 yd. Setting (1) |
Zero range (2) |
Max. P.B.R. (3) |
How It Works: (1) Set scope this amount high (inches) at 100 yards. (2) Verify by shooting at zero range (yards) if possible. (3) Hold dead on and hit to this range (yards). Check out Norma’s Online Ballistics Program
|
|
.270 Win. 130 NBT @ 3100 f.p.s. |
+ 3.1" |
300 |
350 |
|
|
7mm Mag. 150 NP @ 3200 f.p.s. |
+3.0" |
310 |
370 |
|
|
.308 Win. 150 NBT @ 2900 f.p.s. |
+3.3" |
280 |
330 |
|
|
.30/06 180 NP @ 2750 f.p.s. |
+3.4" |
270 |
320 |
|
|
.300 RUM 180 NP @ 3250 f.p.s. |
+2.9" |
325 |
385 |
|
|
.338 Win. 225 NP @ 2800 f.p.s. |
+ 3.4" |
275 |
325 |
|
|
.375 H&H 300 NP @ 2500 f.p.s. |
+ 3.6" |
240 |
285 |
NBT = Nosler Ballistic Tip NP = Nosler Partition