
Jump to: Pillar Installation Instructions | Epoxy Bedding Instructions
 These instructions may be used with any suitable epoxy; however Stocky's Bedding Gel was designed to take advantage of the latest technological advancements in epoxy research. It has the best possible advantages built into it for those that want a butter-smooth, no run pillar and bedding epoxy that provides the strongest possible bond to aluminum, wood and fiberglass-composite gunstocks.
Stocky's® Gel was designed to take advantage of the latest technological advancements in epoxy research. In today's hi-tech age there's tons of epoxies out there, literally one for every conceivable application, but none as time-tested in the firearms community and certainly none easier to work with.
So we got some inexpensive containers and offer it here for a lot less than you'd otherwise pay. This way we can also make up kits that include our pillars with just the right amount of epoxy for pillar installations only, through full-length bedding kits. If you want pricing on quarts or gallons give us a ring.
- Easiest to use of all bedding epoxies:
- No Goof - 1 : 1 Mixing Ratio Right In The Jar Provided
- Viscosity of Petroleum Jelly (Vaseline)
- No-Mess - No Run Formulation
- No Rush - Pot Life One Hour (One Ounce Batches)
- Medium-Fast Set - Disassemble Components in 3-5 hours
- Cures To Shootability in 24-48 Hours
(Thicker application cures faster because it generates more heat)
- Bonds to Wood, Aluminum, Steel, Fiberglass, Plexiglas, Concrete and More
- Strongest Bedding Compound Yet - May be Drilled, Tapped, Filed, Etc.
- Heat Resistant to 350°F
- Waterproof & Gun Cleaning Chemical Resistant
- Super Consistent For Butter-Smooth Mixing
- Mixes With Atomized Metals If Desired
- Cleans Up With White Vinegar While Soft
- Brown and Black Dyes Available

We have our own pillars machined from solid aluminum tube. They are also available in our inexpensive bedding kits. Pre-cut to standard factory (Rem 700) lengths, they have grooves to hold the epoxy (and lock them into place) and sized to precisely fit the holes made by our Perfect Pillar Driller (9/16") to make your job easier. If you are bedding a rifle model other than the 700, measure the thickness of your stock at the takedown screws and cut the pillars to length.
I'd highly recommend doing your own epoxy bedding job. It's easy to do in an evening (on your (protected) kitchen table if necessary) and will get about all your rifle has to offer out of it, especially when using a good fiberglass or laminated hardwood stock. I've seen plenty of non-MOA factory rifles shoot well under an inch, some under 1/2", following a simple epoxy bedding job.
Pillar Installation Material Requirements
- < 1 oz. ea. Resin & Hardener>
- 1 Long & 1 Short Pillar>
- Drill & Bit
- Rubber Gloves
Directions:
1. Drill 9/16" holes in stock using existing holes for guide. Do this by drilling 1/2 way in from the bottom, then finish from the top to increase precision and minimize wood chipping. You can use any garden-variety Home Depot bit but you'll get runout, the best bits to use will have a pilot (protruding shaft) that will follow the existing holes. Stocky swears by his Perfect Pillar Driller for precision, plus it's the perfect diameter for a tight fit with these pillars. We actually cut the pillars to be perfect with our driller and Home Depot bits are not.
2. Insert pillars into holes to check for length and fit. The pillar should be flush with the stock under the receiver (bottom of the receiver radius) as this is the important point. If they protrude from the bottom of the stock (some stock designs are a bit skinnier than standard) simply lay a piece of 300-400 grit Emory cloth on the table and slide one end of the pillar across it to shorten it, and polish the sanded end with 0000 steel wool if desired.
3. Put on the rubber gloves.
4. Using mixing stick, mix a teaspoon of each component smoothly until all one color. Don't whip it like cake-batter; this gets air bubbles into the mixture.
5. Wet-out the inside of the holes you drilled in the stock with thin layer of epoxy. Give it a minute to soak in while you coat the pillars.
6. Fill the grooves of the pillars with epoxy and coat the sides with a very thin layer of it. Keep the container you mixed the epoxy in so you'll know how fast its setting-up (hardening). Review the remaining steps now (below) and prepare the pillars for insertion as directed. There's no rush, you have several minutes before the epoxy starts to set-up.
7. Press pillars flush (or slightly below) into the stock. Wipe off all oozing epoxy. Check inside the holes for stray glue and remove with a Q-tip. Double-check pillar depth because you may have moved it when wiping off the extra epoxy.
8. Before the glue sets-up hard check the pillar depth again so they don't harden in the wrong spot.
9. Wait a day or 2 before mounting and shooting. You can glass-bed it if desired as soon as the epoxy is set-up, usually four or five hours.
Epoxy Bedding Material Requirements
- Receiver Only - 1 oz. ea. Resin & Hardener
- Full Length (incl. barrel) - 2 oz. ea. Resin & Hardener
- Mixing Sticks (1 or 2)
- Epoxy Coloring Agent (recommended)
- Release Agent (recommended)
- Swab or Paintbrush (recommended)
- Q-Tips (recommended)
- Soft Disposable Cloths (recommended)
- White Vinegar (recommended)
- Rubber Gloves (recommended)
Directions:
1. Follow pillar installation instructions above (if applicable) using about a teaspoon of epoxy (just enough to glue the pillars in.) Our gel epoxy mixes in equal parts (1:1 ratio) resin to hardener. You can always mix more if necessary.
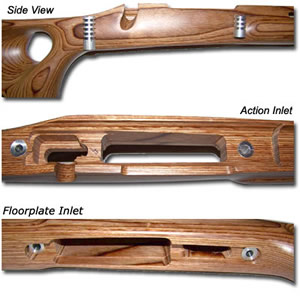
2. Using a Dremel tool, course sandpaper or other implement, remove the finish in the area to be bedded. This is generally the region from the forward end of the magazine, thru the recoil lug mortise, to the chamber portion of the barrel; to a distance of about 1/8" below the top of the stock. Leave it as rough as practical because the epoxy will adhere better, in fact you can rough it up even more with some course sandpaper if desired. Don't worry, you will not even see it once completed.
 3. Prepare stress areas for a thicker layer of epoxy: Undercut (like a dovetail) the area behind the recoil lug. Create 5 or 6 depressions around the front pillar for extra epoxy thickness. The goal here is to create some 'holes' to work epoxy into for added strength.
4. Put on rubber gloves. Using the swap provided, put a thin coating of release agent on any metal part that may come in contact with epoxy. This may include screws, etc.. Let dry completely before proceeding. (Stocky note: Pam no-stick spray vegetable oil works O.K. as release agent for small parts and screws also.)
Special Notes: If there are any holes or other recesses that epoxy could get in to cover them with tape and/or fill them with modeling clay. Personally, we prefer to simply avoid these areas (like the trigger region, bolt release linkage, etc.) Put release agent over the tape. Failure to do so will result in a permantly stuck metal! Some folks also like to put a piece of blue tape on the front of the recoil lug while bedding. This will make it a bit easier to take your rifle apart down the road by making the lug mortise bigger (looser). We don't do this because we like a tight lockup but you may want to.
5. Mix remaining epoxy, color (if applicable) to match and lay it into the stock evenly, like you are frosting a cake. Save a dab of mixed epoxy for timing the cure. Don't whip it like cake-batter, this gets air bubbles into the mixture.
6. Put in the metal slowly and evenly, let it squish the epoxy where it wants/needs to go. Tighten the takedown screws slowly, turning one screw, then the other, back and forth until they are almost hand tight.
7. Using a mixing stick (wipe it off if necessary) run it down the stock-to-metal joints to remove any epoxy where it may have extruded.
8. Let it sit for a couple minutes and finish tightening as usual. If you have a particular torque setting, use it.
9. Repeat Step 7. Rubber-glove covered fingers work well too. (Stocky Hint: Clear, white vinegar works as a solvent for epoxy. Q-Tips or a cloth, dipped in it and run down the seam, makes for a really, really professional job. It temporarily turns the glue white but don't fret - it'll cure to the proper color.)
10. Every hour or so test the cure by visiting the dab of mixed epoxy you saved in Step 5. Once the mixture is fairly hard (just past rubbery) you may carefully remove the metal. This is about 4-5 hours at 75°F. Rap the underside of the barrel just in front of the forend tip with your palm. Careful use of a rubber/wood/leather mallet (or a length of 2x4 pine) in the same spot sometimes frees stubborn receivers. The most common tight spot is the recoil lug, remember all you're trying to do is release the bond with the release agent, one commonly must 'see-saw' the barrel and tang slightly. Do not bang on the screws or anything else for that matter.
11. Rinse the release agent off the metal with hot water and wiping it down. Using hot water heats the metal and causes the remaining moisture to evaporate quickly. A fairly damp chamois works well on the stock regions that agent is covering. The agent creates a thin 'skin' that may also be simply peeled off.
12. Once the epoxy has hardened completely (24 hours) you can lube the metal slightly and put everything back together. We recommend waiting the better part of a week prior to shooting (next weekend). You'll notice that the epoxy will continue to cure for a very long time, eventually becomes very hard, like glass.