
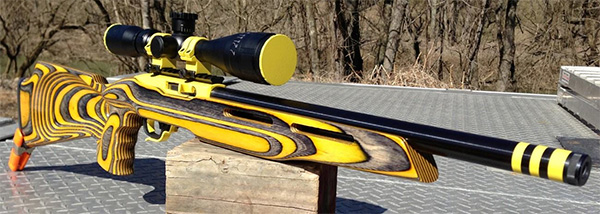
The Ruger 10/22 in its basic form is a simple, reliable .22 carbine. With the advent of aftermarket components the 10/22 has evolved into far more than anyone would have originally thought. There are so many components on the market today that the only limitation is your own imagination and budget. Everything from a mini tactical black rifle to a highly sophisticated, tack driving target/varmint rifle can be assembled by anyone with basic hand tool skills right at home in four easy steps:
- Remove the barreled action from the old stock (one or two screws);
- Remove the barrel from the receiver (two screws);
- Attach new barrel (two screws);
- Attach new stock (one screw).
An experienced 10/22 person can accomplish this in about 15 minutes while sitting on his or her couch. First-time switchers should take their time and allow about an hour, following the instructions below:
 STEP ONE - Remove the stock and barrel band. Start by checking to make sure the rifle is unloaded by removing the magazine and operating the action, peering into the chamber through the open bolt to confirm it is indeed unloaded.
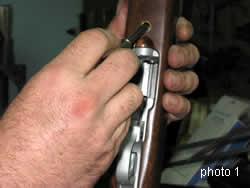
Next, using a flat bladed screwdriver, remove the barrel band, then using the same screwdriver (or allen key) remove the action screw holding the barreled action to the stock. (See Photo 1).
With the rifle safely muzzle-up and the butt plate on a solid, padded surface (like your carpeted floor), place the safety button in the half way position between safe and fire (this will allow the safety button to clear the internal wood of the stock and the barreled action can be removed from the stock).
 To remove the barreled action, put one hand on the forend of the stock, the other hand on the barrel just ahead of the stock and gently pull them apart. Best practice is to press on the bottom of the barrel with the index finger of the hand that is grasping the forend of the stock until the barrel lifts out of the barrel channel and inch or two, keeping a firm grip on the barrel with the other hand so it doesn't go flying. The barreled action pivots upward on the back of the receiver and out of the stock.
Note that the stock finish may have adhered somewhat to the metal especially on older rifles, this is normal. Also, as you are pivoting the barreled action away from the stock, look down at the safety button to be sure it is clearing the stock on both sides.
Still grasping the metal in one hand and the wood in the other, separate the barreled action by continuing to pivot the barrel out of the stock. If you are planning to use the old stock screw you must remove it from the stock. To do this push down on it from the action-side to engage the threads while unscrewing it from below, through the metal stock screw insert (it is threaded in this insert.)
STEP TWO - Once the barreled action is removed from the stock you can replace the barrel. First, pull back on the bolt handle and lock the action in its rear-most position. The barrel can then be removed by removing the barrel retaining block under the barrel in front of the receiver.
Using a 5/32" "L" shaped allen wrench completely remove the two (2) retaining screws. The block will then slide sideways out of the dovetail in the bottom of the barrel. The barrel should then slide straight out, there are no threads or anything, it simply slides straight in and out of the receiver easily. Should the factory barrel be "stuck" in place, making certain the action is open feel free to apply a twisting motion.
Do not attempt to twist the barrel out with the action closed, the action must be open when removing or replacing the barrel. (The cartridge extractor fits into a slot in the barrel. Twisting the barrel with the action closed can damage your extractor.)

STEP THREE - You are now ready to replace the barrel.
With the action bolt locked in the open (rear) position, slide the new barrel in with the dovetail for the barrel retaining block facing down. Simply slide the barrel shank into the receiver until the shoulder ahead of the shank contacts the receiver.
It should be noted that there is a huge variation in Ruger receiver dimensions over the years. Our barrels are held to 0.001" shank diameter. This means that regardless of whether your barrel shank is loose or tight when sliding it into the receiver, by following the simple directions below you will have a very accurate rifle, better than most ammo is capable of producing.
Place the retaining block into position and insert both retaining screws but do not tighten them down yet. Placing some blue (removable) liquid thread-locker (i.e. Loctite) on the threads is a good idea but not required.
Tighten the retaining screws in sequence, left, then right, then left, then right and so on, but stop while they are barely tight and the barrel block still has a little play. Take a good look at everything and be sure it is in alignment, that the barrel is not twisted to to one side or the other, etc.. Tighten the retaining screws slightly but not tight enough keep the barrel from twisting a bit, about one turn from completely down.
Now GENTLY close the action bolt and look to see the extractor is lining up with and entering into the extractor slot in the barrel. It's hard to do this wrong if you followed the directions, but even a slight misalignment can cause problems with reliability. Remember that when you take it out for its first test firing.
To familiarize yourself with proper alignment technique, with the action closed gently twist the barrel just a tad clockwise and counter clockwise, noting where the extractor limits its motion. You'll also notice another important thing, as the barrel twists the retaining block goes out of alignment. When everything lines up and the extractor is centered in the slot, the block will also be perfectly square with the alignment stud protruding from the receiver.
You want the barrel positioned with the extractor in the center of the slot, not rubbing on either side. This should also put the retaining block in precise alignment with the barrel dovetail slot and the alignment stud protruding from the receiver. When you are happy everything is lining up right, tighten the barrel block retaining bolts and check out how the extractor is lining up again to be sure everything is aligned as you tighten.
Tighten the retaining screws when you are ready alternating left as right as discussed. Don't over tighten. The goal here is to have the receiver ring evenly butted-up to the barrel shank that faces it.
If you have a torque wrench, 28 inch pounds is factory spec. This is a lot lighter than most people would expect, about the same value as the rings on your scope tube. If you do not have a torque wrench you want them to be snug but that's about it. Over tightening and / or having one screw tighter than the other is a primary cause of inaccuracy as well as extraction problems. (Too much torque will bend the barrel downwards. Uneven torque will twist it from one side or the other.)
 STEP FOUR - Now that we have the barrel in place we can bolt-up the new stock.
Be sure the safety button is in the center again (half-way between on and off). Place the stock on its butt as before (or in your gun cleaning vise). Place the rear of the receiver into the back of the stock inlet and pivot the barreled end down into place. The last few inches are usually a snug fit. Once you believe it is in place and bottomed-out in the stock, make sure by squeezing the receiver and stock (not the barrel) together with your hand.
Now you have to insert the single takedown screw. Because of its lack of recoil, this is the only screw that will hold it together from now on. You do not use the old barrel band on the new stock.
Now tip the entire assembly (stock and barreled action) over so you see the hole for the takedown screw. There is a stock screw insert similar to the old stock that the screw must first be threaded through. Push firmly on the screwdriver (or allen wrench) while turning the screw into the insert.
Once the threads are past the insert the screw will drop freely to the threaded hole in the bottom of the receiver. The insert is threaded and the screw is designed so it won't fall out and get lost when disassembling in the field.
Turn the screw into the receiver until it is barely snug. The proper torque value is about 18-25 inch pounds. Feel free to accuracy test at 1-2 inch pound intervals, some rifles will have a noticeable preference. Never tighten more than 30 inch pounds.