
Don't forget to check out Stocky's® "Making the Shot", there you'll find everything you need to know get it on and keep it shooting straight when it counts, plus a link to the acclaimed Norma’s Online Ballistics Program to maximize any rifle's point blank range. |
Accuracy is Repeatability
We normally think of this as our personal ability to have the crosshairs in precisely the same spot when our gun goes boom. Shooting sport competitors take the personal aspect quite a bit further, simply stated, having the body tension, the grip on the gun, the breath, everything in exactly the same spot shot after shot (doping for wind of course.) Sure, the design of a certain stock makes it easier to hold steadier, etc. But the physical stress your powder puts on your stock is the other reason you should be considering the importance of the platform you are bolted to. But how may of us consider our chosen stock in the repeatability factor?
If you don't you are making a big mistake. Every time you pull the trigger about 60,000 PSI of force inside the barrel is trying to tear it all apart. When everything settles back together an instant later, it had better settle back in the same spot or no matter what you do, no matter how steady your hold or how concentric your bullets, the next shot will not be pointed to the same place as the last. When the trigger is pulled again and again and again the entire process should take place in a manner as identical to the first shot as possible. And it should do the same next year! The barrel should vibrate the same, the action flex the same and the resting point of it all be the same again and again; season after season. rain, snow or shine.
Bet you appreciate your stock just a little bit more now!
If you have a 1/2" tack-driver now, these recommendations sure can't hurt and will lend a measure of confidence and satisfaction that only becoming intimate with your rifle can provide. If you have a 1+" shooter you may find you really have a sub-moa shooter there. And if you are all over the paper this may very well be the cure!
Understanding Inlets
Inletting is a term applied to woodworking that refers to the cut-out that lets something to fit into it. Just as water flows into an inlet in the land, so should a piece of metal, in this case a rifle's barreled action, fit into the wood or synthetic material being used as a handle with which to operate it. There's no better way to get this fit than with glass bedding.
The goal in any bedding job is simple - get a fit that puts absolutely no stress on the action when tightened into the stock. One-hundred percent even support. There's a discussion by Jon R. Sundra about the best way to bed a barrel so it's not just me talking here. 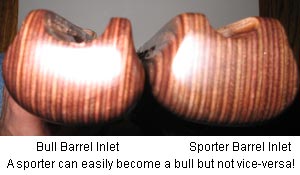 He also discusses the choice between walnut, laminated and various synthetic stock materials, free floating the barrel and other valuable bedding techniques so it's worth a read.
Fitting & Floating Your Barrel - Featherweight to Heavy is No Bull
(Sorry, couldn't resist the pun.)
As a rule of thumb, one can always remove wood but it's more difficult, and unsightly, to replace. (No kidding, huh?) With this in mind we can understand why so many aftermarket stocks are produced in the narrower barrel contours. Should one purchase a stock with a bull barrel channel, or even a so-called varmint or magnum inlet, an unsightly gap would be visible for the users of anything lighter in weight that would be difficult to replace.
 If you have a heavier barrel than your stock is inletted for, a piece of sandpaper wrapped around a dowel, pipe or anything approximately the same diameter as your barrel makes quick work of this easiest-to-adjust section. Simply sand the channel evenly in a back-and-forth motion until it fits! Dropping in your metal along the way will reveal if you should apply more pressure on one particular side or the bottom. The actions are identical, a 700 long is a 700 long no matter what barrel they screw on it, so no other work is required to get a good fit.
This is also the best way to free float your barrel. Simply keep sliding a dollar bill between the stock and the barrel, sanding until it slides freely. Pay special to that annoying bump near the forend, if any. Wiping in some TruOil or Minwax Poly Clear (or equivalent) once the sanding is complete, will re-seal it against the elements. Re-sealing would be mandatory on a solid wood stock, recommended on a laminate and unnecessary on a synthetic.
Sendaros, some magnums, heavy varmint tapers and some of the thick target barrels we are seeing will definitely require a wider-than-sporter channel.You are either going to open up the barrel channel as above or wait a month of sundays until your special order arrives if you want a laminate (although I do stock them when I can get them, as you can see some are available in the store.)
If you really want a no-brainer I have really nice synthetics that will work right out of the box also and are usually in stock. Forget about cheap injection molded synthetics if you want a tack driver, you need a hand-laid fiberglass / Kevlar unit for proper action support, plus injection molded "tupperware" stocks really stink for bedding jobs. Don't waste your time on them.
 Pillars of Strength
A pillar bedding job (pillar bedding instructions), does its work by eliminating the compression that exists between the action and the floorplate. In other words, the aluminum pillars give the receiver something more solid to sit on, therefore results in less movement between the stock and the action when fired. It, combined with a complete AcraGlas bedding job is the best possible platform to bolt any barreled action to regardless of the materials the stock was constructed from.
The best pillars we have found are the 9/16" Aluminum Pillar Bedding Sleeves. These have a 'V' at the receiver end for a better grip in round-bottom receivers like the Rem 700 and Savage 10/110 (this end is squared off when bedding a flat-bottom like the Win 70 or Weatherbys), grooves milled in the sides to hold bedding compound and create a mechanical lock in addition to a chemical bond when installed.
Nothing further is required, you should see improvement immediately. Simply wait a few days for the gel to harden and shoot. But since most of the folks reading this are perfectionists, we'll now take it to the next level with an AcraGlas job ...
Preparing for 'Glass
As mentioned, the finest bedding possible is with fiberglass epoxy, and my favorite is our Epoxy Bedding Gel. I prefer the gel over the other brands because it is one of the strongest bonding agents available, is just the right viscosity and shrinks less than 1%. Some of the epoxies used in the industry are not designed for bonding (don't adhere to the stock well), some are too thick (don't get the accuracy I like because they don't fill corners well) and others too thin and make a real mes.
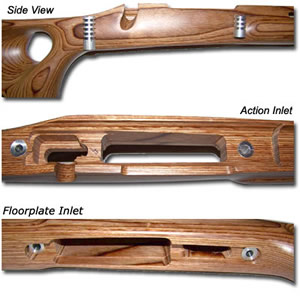
 Once the pillars are installed, the area surrounding the recoil lug should be prepared for bedding. This is quickly accomplished with a Dremel using a drum sander to do the roughing up and a routing bit for the other cuts, but a piece of sandpaper and a drill or chisel, even a sharp knife, will work just fine. There are several goals here, and it doesn't matter if you are bedding a laminate or fiberglass stock:
- Removal of any finish or high spots which may interfere with bond or uniformity;
- Create a rough surface to increase surface area for the chemical bond;
- Create recessed areas to work the epoxy into for a mechanical lock;
- Strengthen high-impact areas especially behind the recoil lug.
 Finishing the Job
As you can see, when done correctly the glass hardens perfectly molded to your rifle. Nothing could possibly fit your rifle better. If you remove your action after the first go and see voids, no worries, simply mix up a little more, fill those spots and clamp everything back together. It will harden like they were never there.
If you laid a bit too much and it squishes out of the stock when you tighten the bolts, simply wait about 4-5 hours and trim it flush with a razor knife. It can be sanded once hardened also. As long as you remember to use the release agent (read the directions) you really cannot screw it up.
The photo to the left shows a full length job that resulted in significant improvement even on this aluminum blocked stock. It just don't get any better than that. If it doesn't shoot now, sell it and get a new one.
 Bottom Fit & Function Issues: We have measured dozens if not hundreds of screws, receivers, floorplates and other factory parts and it may or may not come as a surprise to anyone that there can be significant variation. illustrated by the brand-new 2008 Remington model 700 BDL LA floorplates on the left, you can see it would be impossible for any stock manufacturer to make a one-size-fits-all situation, yet their experience in the industry serves them very well. Got to admit, they come pretty close.
Photo A.
An outstanding production inletting job.
Photo B.
If you had this floorplate you'd be shooting groups with your new stock at daybreak. Snaps right in.
Photo C. Hey, this isn't what you paid for is it? It's the exact same stock as above!?!
Check out the picture of the 2 floorplates below. Note how the owner of the black floorplate would be presented with several what may appear to the amateur to be uncomfortable choices. But is it the stock's fault?
Question is, what to do?! Bolt it down and forget about it? Resist the temptation. This will bend the floorplate possibly to the point of failure. Certainly will not do anything good for function or accuracy either.
Possible Cures:
Metal sits too high - adjust the depth of the factory inlet with a Dremel or other woodworking tool to fit perfectly. You must first determine exactly where to remove material before tackling this, do not do it blindly!
Metal sits too deep be creative with spacers (also known as washers to the common man.) See Photo D. Placing them strategically at the front and/or the back screw holes will solve many problems and is a recommended solution to get up and running quickly, many factory rifles have them right in the box. Stainless steel works best because there's little fear of rust over the years. Tinker with thickness to flush-up floorplates and triggerguards that sit too deeply in the stock. Stack several if necessary. Grind to correct taper, thickness and/or width if desired. You won't see them when the floorplate is installed so it matters little what they look like. If bedding the action consider bedding the floorplate while you are at it (and embedding any spacers permanently) for a perfect fit. Be sure to test hinge freedom before calling it a day. Function always trumps everything else.
Screw Issues - when you are ready to screw it all together there is one final detail that must be addressed - be sure the screws are the appropriate length and tightness for your rifle! The easiest way to do this is to screw it together and pay attention to the look and feel, believe it or not. To do this, first remove the bolt (the big one you use to cycle the cartridges) from your rifle. Put the barreled action and floorplate only (no magazine parts just yet) into the stock and insert the takedown screws just barely tight. Notice how many turns you got into the receiver, did you get at least 3 or four? If not, you may need longer screws but make note of this and continue. Now peer into the locking lug raceway and rear of the receiver where the screws would protrude. Continue tightening until you feel the receiver seat into the stock, then a 1/4 turn more. Does any portion of the screw stick up into the receiver in a way where it could interfere with the locking lugs or bolt body? If it checks out O. K. then put the magazine parts back in and repeat.
 Receiver screw spacing and other critical-to-drop-in-fit dimensions can be varied at the factory intentionally or unintentionally also. As noted by the floorplates on the left they are far from infallible.
There are several instances recently of Remington screw holes being enough off to require widening of stock screw holes, albeit an easy enough task to correct with the stock. If your receiver screws don't line up be sure you have the right stock of course, then simply enlarge the holes slightly with a file, drill or other suitable implement.
Screws too short - get a set of XL screws. These are about 1/2" too long so cut the majority off with a hack saw or Dremel and file to the precise length, about 1 turn from flush on the inside of the receiver because you may need another turn down the road. Final check is the free movement of the bolt. Check it again after firing.
Screws too long - file to the precise length, about 1 turn from flush on the inside of the receiver with all parts installed because you may need another turn down the road. Other excellent option is to install a spacer as above. Final check is the free movement of the bolt. Check it again after firing.
Torque settings - depending on who you listen to, use these as a rule-of thumb guide. Accuracy is the boss here (as long as they are at least about 25 in/lbs or so minimum.) The front one is the most critical, tighten it last. This will put any uneven stress to the rear, away from the locking lugs. Check it again after firing.
Solid wood - 25-30 in/lbs; Laminates 25-40 in/lbs; Fiberglass 30-40 in/lbs; Aluminum - 50-60 in/lbs
One more important tip: We strongly recommend using a good epoxy on your swivel studs!!!
Feel free to email your technical questions to stocky@stockysstocks.com or call (561) 547-4704.
We can go on and on with creative adjustments we've applied over the years. Engineering them is a part of the enjoyment, not to mention pride of ownership of our truly self-customized rifle. If you object to doing them all I can say is keep the tupperware!
- Stocky
Make that all-important first shot count every time! Don't forget to check out Stocky's® "Making the Shot", you'll find everything you need to know get it on and keep it shooting straight when it counts, plus a link to the acclaimed Norma’s Online Ballistics Program to maximize any rifle's point blank range.
(The instruction links above are .pdf files of the actual instructions that come in the respective boxes. All Accurizing Supplies mentioned are available in Stocky's® Store. We offer a pillar installation service that ships either drop-in or with surfaces prepared for bedding as illustrated above.)